"Injury is probably the most under recognized major public health problem facing the nation today, and the study of injury represents unparalleled opportunities for reducing morbidity and mortality and for realizing significant savings in both financial and human terms-all in return for a relatively moderate investment."
The above statement, now 5 years old, continues to ring hollow in most medical research facilities in North America. All causes of injury have been estimated to kill more than 142,000 Americans each year and cause more than 62 million persons to require medical attention annually. The U.S. Consumer Product Safety Commission has reported 5 million medically treated injuries associated with 15 of the most popular sports in a l-year period. Injuries are the greatest single killer of individuals from ages I to 44 years and cost the nation approximately $133.2 billion each year.Thus, it is an understatement that injuries are an enormous public health problem that continue to usurp our limited health care financial resources.
In North America, a vast majority, if not all, of the training programs for sports medicine personnel including physicians focus on the treatment and rehabilitation of the injured individual. Little, if any, attention is given to teaching the skills required to evaluate a problem from a preventive approach, and the development of a preventive approach to a problem is consequently underemphasized or even nonexistent. Such is currently the case with sport medicine, a field in which prevention can take the form of modifications in training, preventive equipment, and elimination of unsafe practices.
Several published research studies emphasizing the preventive approach within the sports medicine field have yielded an enormous reduction in injury rates, as well as an enormous reduction in health care costs. Peterson's1970 analysis of injury rates in football led to the elimination of cross-body blocking and a substantial reduction in football injuries. The institution of passive preventive measures as recommended by the research of Pashby et al., involving protective eye wear during racquet sports, has led to significant diminution in eye injuries and associated health care costs.
Similarly, in the United States more than 40 million individuals nationally participate in organized softball and baseball leagues, playing an estimated 23 million games a year in the United States. It has been estimated that softball and baseball injuries are two of the leading sports related causes of emergency department visits in the United States. Previous studies conducted in Ann Arbor, Michigan, have elucidated that sliding is responsible for more than 70 percent of all recreational softball injuries. Also, break-away bases, which have been used in recreational softball leagues, have resulted in a 98 percent reduction of injuries and a 99 percent reduction in acute health care costs. An independent analysis by the Center for Disease Control in Atlanta, Georgia, has determined that the use of break-away bases has the potential of preventing 1.7 million injuries a year in the United States, with a savings of $2 billion a year nationally in health care costs. Also, in a recent study conducted within the NCAA and professional minor league baseball by the Institute for Preventative Sports Medicine, an 80 percent reduction (P <.05) was noted in this high-performance baseball population using break-away bases. This series of studies is a testimonial to the impact prevention-related research within the sports medicine community can have on a nationwide basis.
On the one hand, research directed toward documenting the efficacy of preventive measures in sports seems to be logical, straightforward, and relatively simple. Unfortunately, this is not the case at present. Even with well substantiated studies, the enforcement of protective rules and use of protective equipment continue to be shunned by the athletic community at large. Tradition has been one of the major obstructions to introducing new rules or equipment to prevent injuries. Implementing equipment changes such as break-away bases may offend the traditionalist and undermine traditional aspects of the sport. Also, other obstacles such as ignorance or lack of recognition of safety measures can delay or block instituting preventive measures.
Unfortunately, the general public can be misled by unethical and unsubstantiated prevention claims in product promotion. An example is the misleading use of medical research and testing by the Megg-Nets USA and Riley-Meggs Industries. A U.S. District Court judge has held these companies liable for unfair competition and false advertising for the unauthorized and improper use of re search and test results in connection with their products- when, in fact, their products were not used in the testing or study. The medical community cannot stand by and allow the innocent public to be duped by unsubstantiated, false, and misleading advertising claims about safety.
Similar examples that can be brought to light focus on the chest and head impact fatality scenario that is occurring in youths between ages 5 and 14 years playing baseball in the United States. The Consumer Product Safety Commission has determined that baseball is the number one sport leading to fatalities in the United States. The two common scenarios for fatality include being struck either in the chest or in the head with a pitched or batted baseball.Studies conducted by Janda and Viano at the Institute for Preventative Sports Medicine have, in fact, shown that manufacturers' safety claims are grossly exaggerated. The studies completed at the institute on the chest impact side of the equation reveal that softer baseballs and chest protectors for batters and pitchers, in fact, do not provide any protection, and some of these products actually enhance the impact when measuring force, momentum, energy transfer, and a measure of the risk of injury-viscous criterion. A similar study focusing on head impacts revealed that manufacturers' claims are grossly overexaggerated. This misinformation by several of the manufacturers imparts significant misinformation to the public and therefore leads to a public that is actually being exposed to further injury needlessly. Further, implementation of some protective equipment may be expensive and resisted by communities, schools, and organizations, because they must absorb the additional cost without benefiting directly from reduced insurance premiums.
It is of paramount importance that citizens, organizations, and most important, physicians, researchers, and other health care professionals maintain persistent pressure on all organized sports groups, school leagues, city leagues, professional sports, and college sports to consider and promote improved equipment, safer techniques, and preventive measures. It is obvious that without this leadership by physicians and health care personnel, the necessary changes will not be instituted, and therefore, injury will continue to drain our already overburdened health care systems.
It has been well documented that throwing athletes, and, in particular, baseball pitchers at all levels of competition, face a substantial risk of injury. It has also been reported that 50 percent of all professional baseball pitchers experience sufficient shoulder and elbow symptoms to keep them from pitching at various times in their careers. Thurston has identified eight common causes of pitching injuries. They include fatigue such as the overuse syndrome, lack of proper conditioning, lack of development of the pitching arm strength, lack of proper warm-up and stretching, lack of a recovery program or a recovery time between pitching rotations, attempting new techniques while throwing at full velocity, overstretching of the soft tissues about the shoulder joint, and improper throwing mechanics.
It is imperative that orthopaedic surgeons turn the focus of their attention to the prevention of injury. This is of particular importance in the glenohumeral joint, where most injuries in the athletic and occupational populations are related to overuse. The countless hours of training and practicing are to be condemned if faulty technique or improper methods lead to damage to the musculoskeletal units about the glenohumeral joint. The underlying principle of prevention is applied common sense. A musculotendinous unit is only capable of resisting as much.as it has been prepared to resist.
The basis of a preventive program designed for the glenohumeral joint is preparation. The preparation must invoke overall body conditioning, flexibility, and strengthening of the musculature about the glenohumeral joint and scapula.
Several rehabilitative exercise programs have been developed such as the program instituted by Jobe and Moynes,which focuses on a stretching and strengthening program with free weights.
This chapter reintroduces the technique of proprioceptive neuromuscular facilitation (PNF). I have developed this approach into a preventive technique that is-under clinical investigation at the institute for Preventative Sports Medicine. PNF was developed at the Kabat-Kaiser Institute by Herman Kabat, MD. Techniques of PNF invoke placing a demand where a response is desired
These techniques may be defined as methods of promoting or hastening the response of the neuromuscular mechanism through stimulation of the proprioceptors. Emphasis is placed on the application of maximal resistance through out the range of motion, using many combinations of motions in a pattern format. Motion is first performed in the strongest part of the range, with progression toward the weaker parts of the range of motion. Stretch is applied to groups of muscles, usually synergists, for greater proprioceptive stimulation. The technique of repeated contractions is used to gain range of motion as well as to improve endurance. The patterns used are spiral and diagonal in character and closely resemble the movements used in sports and in occupational activities.
There are two diagonals of motion for the head and neck, the upper trunk, and the upper extremities. Each of the two diagonals is composed of two antagonistic patterns. Each of the spiral and diagonal patterns is a thee component motion with respect to the glenohumeral joint. The three components include flexion or extension, abduction or adduction, and internal rotation. A pattern of motion permits the musculature to contract from a completely lengthened state to a completely shortened state when the pattern is performed through the full range of motion.
The pattern of muscles contracting toward the shortened rate is termed the agonistic pattern. The pattern of muscles approaching the lengthened state in cooperation with those of the agonistic pattern is termed the antagonistic pattern.Two types of muscle contraction are used in the PNF techniques. The first is an isotonic contraction, which is induced as the patient performs the particular pattern through a range of motion. The second is an isometric contraction, which is induced as the patient holds the upper extremity still without permitting a range of motion. The goal of this technique is a coordinated performance of patterns of facilitation through ? full range of motion and with a balance of power between antagonistic patterns of both diagonals of motion. In my current clinical investigation, I have implemented this technique as a purely preventive program in throwing athletes. The program that is currently being used focuses on the neck, upper trunk, and upper extremities. Initially, the patterns are implemented under the guidance of a trainer. Once the patterns are learned by the individual, a buddy system is used. The timing of these patterns is discussed later in this chapter.
For the program to be effective, a routine must also be used for throwing athletes. The routine that I have implemented is as follows:
The program I have outlined is purely a preventive one for the upper extremities in the throwing athlete. I believe, however, that this program can be implemented in non throwing athletes and in the occupational population involved in overhead activities. I have found this program to be easily used in an university setting. The keystone to this program is the participating individual. For optimal results, the program should be performed as outlined in this chapter.
With more people flocking into recreational and team sports for cardiovascular fitness, the likelihood that shoulder symptomatology will develop is high. It is therefore imperative that a preventive program be developed and used in both the athletic and occupational populations.
In addition to the preventive upper extremity program that I have implemented with the assistance of Warren G. Crouch, a testing protocol has also been developed with the assistance of Peter V. Loubert, Ph.D. Both of these are under clinical investigation at the Institute for Preventative Sports Medicine. This testing protocol is designed for use as a repeatable performance measure for baseball pitchers or for throwing athletes participating in our sports injury prevention program. It is intended to provide objective performance data to accompany clinical and epidemidlogic data. This information is believed to be necessary because it measures the performance effectiveness of the throwing athlete involved. This testing protocol has been designed to have both functional and controlled clinical components (i.e., to be easily carried out and, it is hoped, objective).
Six tests are performed. Four are performed on the Biodex (Shirley, NY) dynamometer, and two are functional activities involving throwing. Because pitching is the activity of interest, the two most important characteristics to measure that have a bearing on its effectiveness are speed and accuracy. These are described in tests 1 and 2, respectively. Of the Biodex tests, two are relatively common: internal/external rotation with the arm at the side and with the arm abducted to 90 degrees. These are described as tests 3 and 4, respectively. They provide a relatively good measure of strength of the rotator cuff musculature, one of the obvious potential limitations to a person performing high-intensity throwing tasks. The remaining two tests are for strength and endurance in the principal diagonal direction used for the throwing motion (i.e., moving from a flexed, abducted, and externally rotated position to an ex tended, adducted, and internally rotated position). The strength and endurance tests in the diagonal plane are described as tests 5 and 6, respectively.
Test 1 - Maximum Throwing Velocity
Test 1 measures the maximum throwing velocity that a pitcher is capable of. It requires a testing site that is comparable with a normal pitching situation, specifically a pitcher's mound, a catcher, and a normal distance for the pitches. It is also requires a radar gun for measurement of pitch velocity.
Procedure
Test 2 - Throwing Accuracy
Test 2 measures the accuracy that the pitcher is capable of. It should be performed immediately after the participant completes the 5-minute cool-down from Test 1. The test requires a square target (18 in. to a side) placed on a pitcher's screen 20 in. from the ground. The target should be placed the normal distance from the pitcher's mound to home plate.
Procedure
Tests 3 to 6
Tests 3 to 6 are performed m a single session after the session for tests 1 and 2. The second session should occur not less than 1 hour or greater than 5 days after the first session. Both the dominant and non dominant sides of the body should be tested for these four tasks.
Test 3 - Shoulder Rotation From a Neutral Position
Test 3 is a standard Biodex test for internal and external rotation with the arm at the side.
Procedure
Test 4 - Shoulder Rotation From a Position of 90 Degrees of Abduction
Test 4 is a standard Biodex test for internal and external rotation with the arm elevated 90 degrees from the side.
Procedure
Test 5 - Diagonal Strength
Test 5 is a strength test in a diagonal that is similar to the normal throwing plane and to one of the diagonals used in a strengthening exercise protocols. The set-up for this test and for test 6 requires the use of an alignment prop. The alignment prop should be a 2-ft-square piece of cardboard that can be laid on the floor in front of the subject being tested. It should have two bold lines that intersect at a 45 degree angle and that can serve as a visual guide to ensure consistency in setting up the subjects. The directions of the motion should be from a position of abduction, flexion, and external rotation (away from the body) to a position of adduction extension and internal rotation (across the body).
Procedure
Test 6 - Diagonal Endurance
Test 6 is an endurance task in the same diagonal plane as that for test 5.
Procedure
SUMMARY
In summary, it is the responsibility of every health care provider within the field of sports medicine to make the practice of prevention the rule and not the exception. If we are truly serious about reducing morbidity, mortality, and the health care dollars spent on sports injuries, we, individually and collectively, must emphasize the development of preventive techniques that would lead to a significant reduction of injuries. Also, we must develop testing protocols that scientifically and thoroughly evaluate our efforts to truly monitor our effects. It has been my experience that the preventive PNF program outlined in this chapter, as well as the testing protocol outlined, accomplishes both goals.
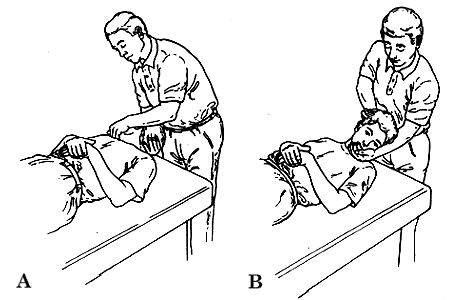
Figure 1. Neck exercise. Patients is in a supine position. Standing at patient s head, one hand is placed under chin (chin cupped in palm) and the other hand under occipital area. (A) In rhythm and with resistance, the patient should flex and rotate the neck until the chin reaches the center of the clavice. Then, in the reverse diagonal, the extension and rotation should be performed. This is repeated 10 times in each direction. (B) This and all proprioceptive neuromuscular facilitation exercises are isotonic and should be performed in rhythm and through the fullest range of motion. A diagonal pattern should always be used.

Figure 2. Left or right shoulder exercise. Patient is in a supine position. With the therapist standing at left or right side of patient. (A) The exercise should start on the right side. The arm should be entirely straight throughout the patterns, keeping the elbow stiff. The patient's hand is grasped with your right hand when you are standing on the right side. Your left hand should support the patients elbow. (B) You can start with either the upward or downward diagonal. As the patient moves the arm into extension internal rotation, the guideline should be anterior iliac crest. As the patient moves the arm up and out (flexion external rotation), the diagonal angle should be maintained in the opposite direction from the anterior iliac crest. It should be noted that the adduction can be added to the extension internal rotation pattern and that the abduction can be added to the flexion external rotation pattern. This exercise is repeated 10 times, with some resistance in both diagonal directions.
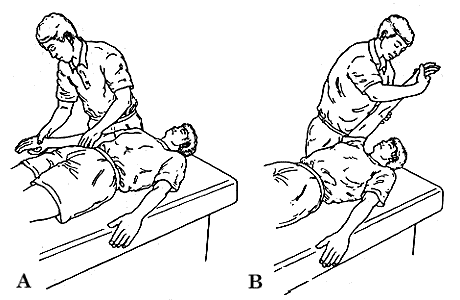
Figure 3. Left or right shoulder exercise. Patient is in a supine position. (A) Starting on the right side, you should keep the patient's elbow stiff. With your right hand, you grasp the patient's hand. With your left hand, you support the elbow. Our landmark will be the nose and its opposite diagonal. (B) Exercise is begun either up and in- or down and out. When going up and in toward the nose (flexion external rotation adduction), you must remember to keep the elbow stiff. When going down and out (external abduction and internal rotation), you can follow the opposite diagonal from the nose. The pattern and rhythm should be kept. This exercise is repeated 10 times in each direction with some resistance. (It is important to always be careful not to administer too much resistance, only what each individual can handle through the fullest range.)
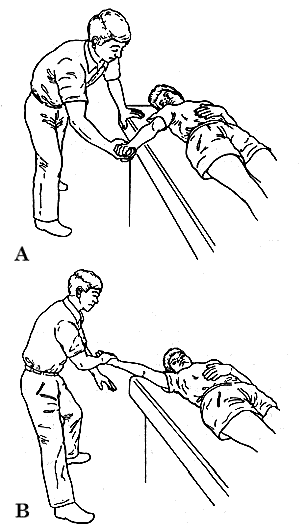
Figure 4. Shoulder joint and shoulder girdle exercise. Patient is in a supine position. (A) Starting on the right side, you should grasp the right hand of the patient with your right hand. You must support the elbow with your left hand. The elbow must be kept straight throughout this motion. The exercise is begun by placing the patient's arm along the side of the rib cage toward the posterior side. (B) You should follow the abduction external rotation, then adduction internal rotation toward the posterior side of the rib cage. As you take the arm away from the rib cage, the shoulder should be immediately rotated externally while abduction is also occurring. The upper extremity is taken through the fullest range of motion possible with some resistance. The motion is reversed going into adduction and immediately the shoulder adduction internal rotation toward the posterior side of the body is begun. You should follow the rhythm through the fullest range of motion with some resistance.
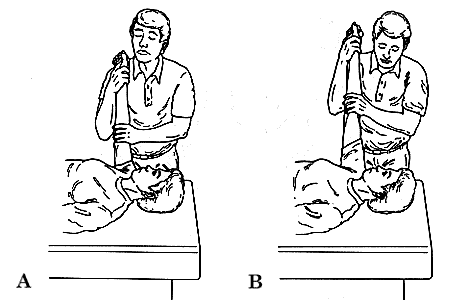
Figure 5. Should girdle and scapula stabilization exercise. Patient is in a supine position. (A) You stand on patient's side with arm pointed straight at ceiling and with the elbow kept stiff. (B) The arm is pushed straight up and down again with the elbow kept stiff. You should apply resistance in both the up and down motion. The elbow must be kept stiff at all times. This exercise is repeated 10 times up and down.
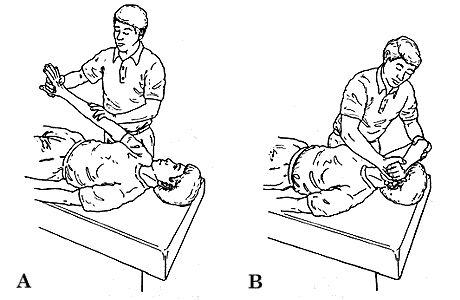
Figure 6. Combination shoulder and elbow exercise. Patient is in a supine position. (A) Standing at the patient's side, you start with the elbow bent to 90 degrees. If you are working the right arm, you grasp the patient's hand with your right hand and support the flexed elbow with your left hand. (B) This motion will include flexion of the shoulder and at the same time supination of the elbow and hand squeeze (finger flexion). When taking the arm up and over the head, the elbow is kept bent and the forearm supinate. When you start to return, you lead with the shoulder extension and elbow extension at the same time. The extension should be 45 degrees to the horizontal. Some resistance should be applied while maintaining the rhythm. This motion is repeated 10 times.
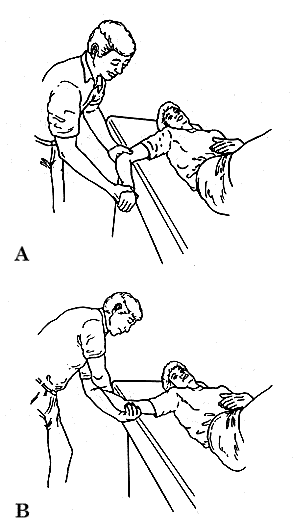
Figure 7. Shoulder exercise. Patient is in a supine position. (A) You stand at right side of patient. This motion will begin with the elbow bent at 90 degrees and with the shoulder abducted. This motion focuses on internal and external rotation through the fullest range possible, with resistance. (B) The right hand of the patient is grasped with your right hand and the elbow supported with your left hand. While applying these patterns, the shoulder should be kept in an abducted position. The elbow should not be allowed to slide downward from the abducted position. Tightness is indicated when the elbow wants to slide into a more adducted position. Motion should not be forced, and only the fullest range that the person can perform should be attempted.
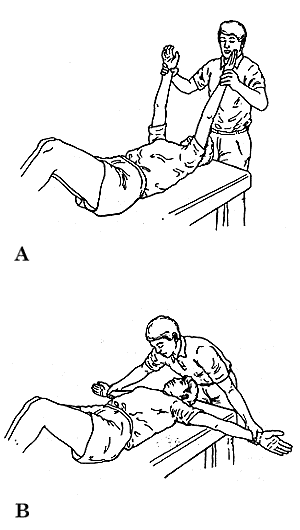
Figure 8. Shoulder girdle exercise. Patient is in a supine position. (A) You stand at the head of patient. The patient's arms should be straight and pointed toward ceiling. You grasp both hands. (B) The patient should horizontally abduct shoulders and then horizontally adduct shoulders. This is repeated 10 times with resistance.
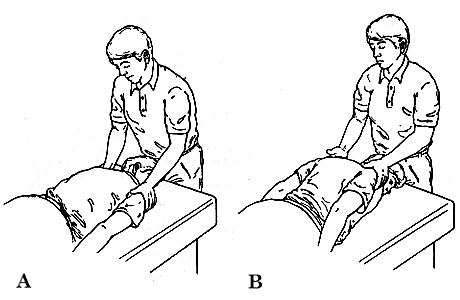
Figure 9. Scapular exercise. Patient is in a prone position. The head is turned onto the ear (not the cheek). (A) Arms should lay along the side of the body. (B) Only shoulders are worked up and down with some resistance. This exercise is repeated 10 times.
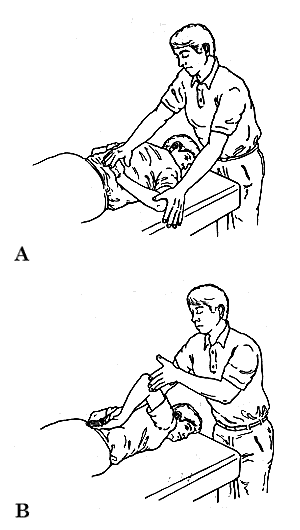
Figure 10. Shoulder girdle exercise. Patient is in a prone position. The head is turned onto the ear (not on cheek). (A) The shoulder is internally rotated until you can place the patient's hand onto the the lumbar area. (B) The hand that is on the lumbar area is held gently and carefully. With your other hand, you grasp the bent elbow. Again, the patient should carefully work the elbow up and down using some resistance. This exercise is repeated six to eight times.
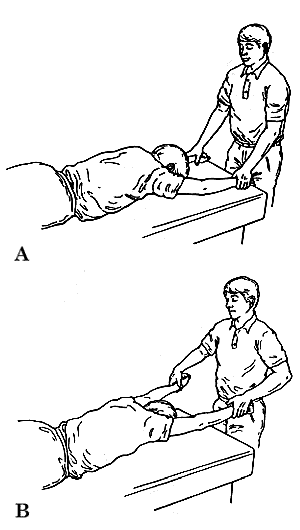
Figure 11. Shoulder girdle exercise. Patient is in a prone position with a pillow under the stomach. Elbows are straight with arms close to the ears. (A) You grasp each wrist with your hands. (B) The patient should lift the arms up and down using resistance in both directions. This exercise is repeated 10 times.